American Flag Taco Dip is the kind of party dish that disappears fast because it hits every note people want from a layered dip: creamy, salty, cool, and just a little messy in the best way. The flag design turns a familiar taco dip into the first thing people notice on the table, but what keeps it getting scooped down to the bottom is the balance of beans, seasoned cream cheese, guacamole, salsa, and that cold sour cream finish.
The trick is building layers that stay distinct enough to hold the pattern. Softened cream cheese mixes smoothly with taco seasoning, the guacamole gives you a stable middle layer, and chilling the dip before serving helps the top settle so the stripes don’t slide around the second a chip goes in. A rectangular dish matters here too, since the flag shape needs clean edges to read well.
Below, I’ll walk you through the layering order, the easiest way to pipe the stripes without making a mess, and a few swaps if you want to stretch it for a bigger crowd or adjust it for different toppings.
The layers held their shape after chilling, and the sour cream stripes made the flag design look sharp right up until the chips hit it. The cream cheese layer was the best part — it kept the dip from getting watery like some taco dips do.
Save this American Flag Taco Dip for the next cookout when you want a patriotic centerpiece with creamy layers and crisp, colorful stripes.
The Part That Keeps the Flag From Sliding Into a Mess
The biggest mistake with layered taco dip is rushing the top. If the base is too warm or the guacamole is spread on before the cream cheese layer is smooth, the whole thing starts to slump and the flag stripes lose their shape. This version works because each layer has enough body to support the next one, and the chill time gives the dip a little structure before serving.
Use a rectangular dish with straight sides if you can. The clean shape makes the flag design easier to build, and it helps the layers stay even from edge to edge. The other thing that matters is thickness: thin layers look neat, but they don’t hold up under chips the way a generous, even spread does.
- Refried beans — This is the foundation, so use a thick brand that spreads without being loose or soupy. If your beans are stiff straight from the can, stir in a spoonful of salsa or a splash of water just until they spread easily.
- Cream cheese — Softening it fully is nonnegotiable. Cold cream cheese leaves lumps, and those lumps make the taco seasoning spread unevenly. Beat it until smooth before you add the seasoning.
- Guacamole — This layer adds richness and helps separate the seasoned cream cheese from the cheese on top. Store-bought works fine here if it’s thick; watery guacamole will smear the design and soften the top.
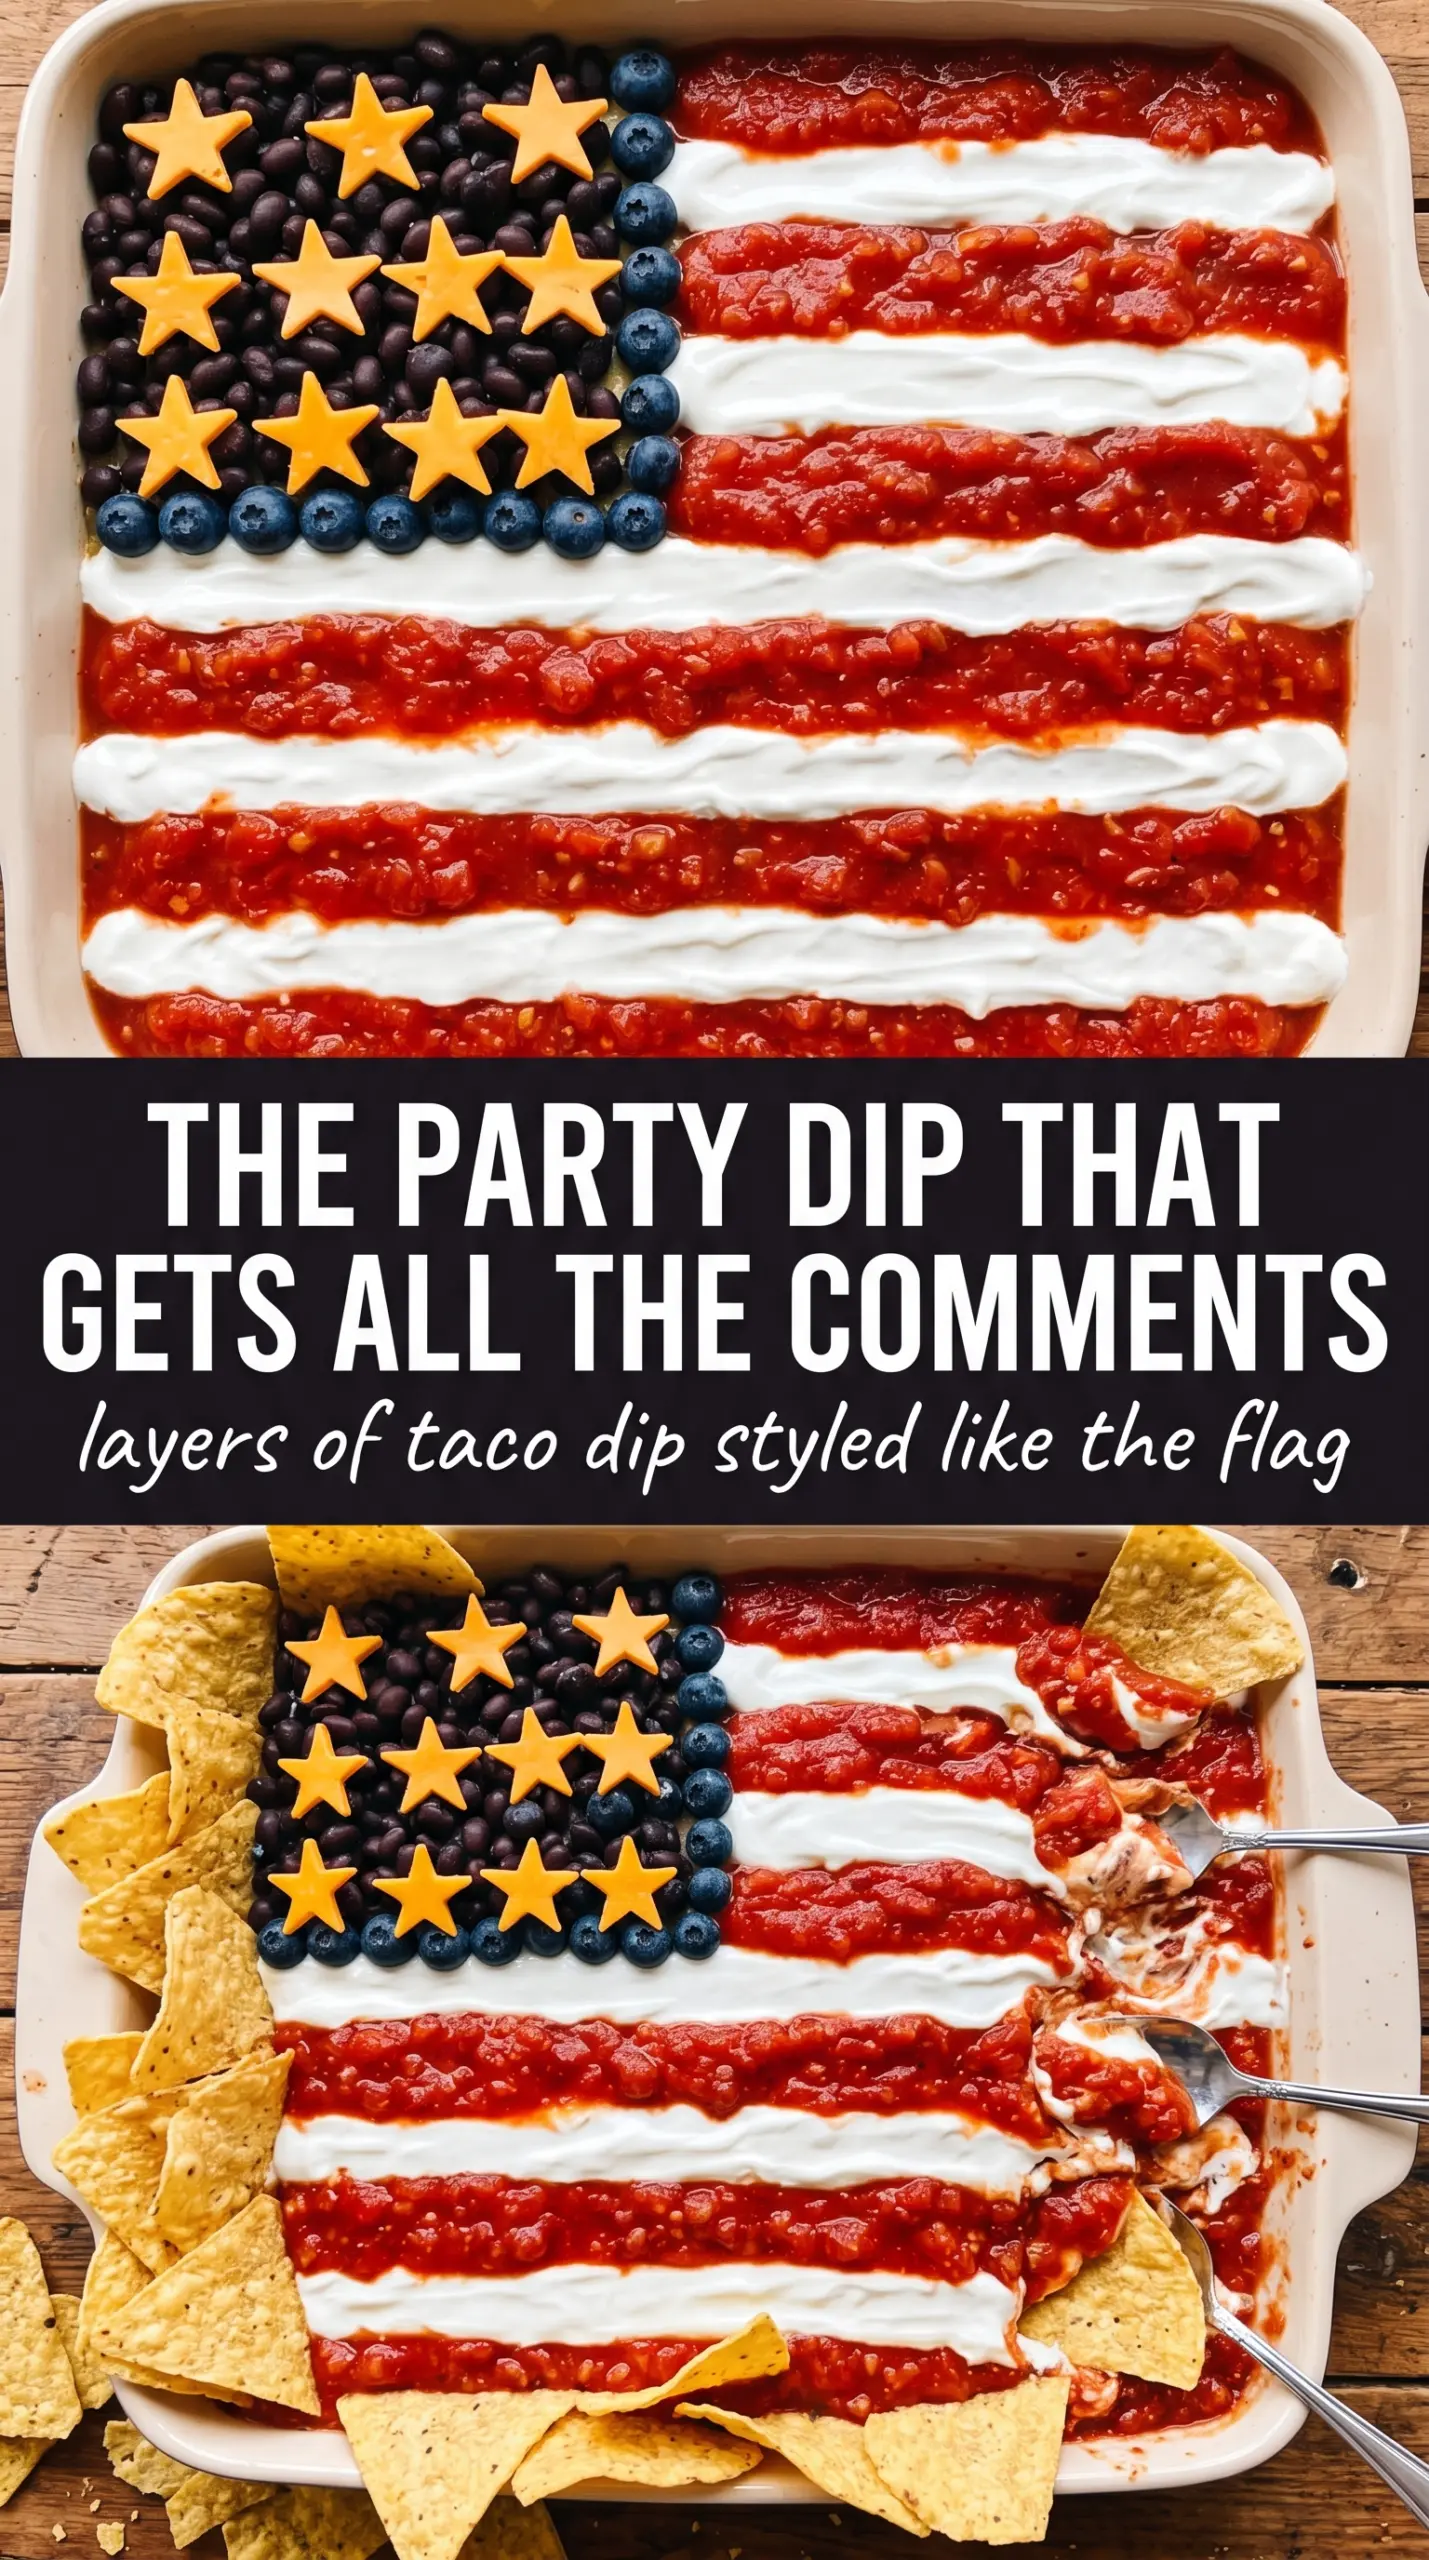
- Sour cream — Pipe it instead of spooning it. That gives you the crisp white stripes the flag needs, and it keeps the top clean enough for the red rows of salsa to stand out.
- Black olives or blueberries — For this dip, sliced black olives are the practical choice because they stay savory and fit the Tex-Mex flavors. Spread them tightly in the upper-left corner so the blue canton reads as a solid block.
What Each Ingredient Is Actually Doing in This Recipe
- Primary ingredient (the star) — Quality matters most. Choose the best you can find.
- Cooking medium (oil, butter, or broth) — This carries flavors and prevents dryness.
- Seasonings (salt, pepper, spices, herbs) — Layer flavors so nothing overpowers. Build depth gradually.
- Aromatics (garlic, onion, herbs) — Cook with fat to bloom flavors. Become the foundation.
- Supporting ingredients — Complement the main ingredient without overpowering it.
- Sauce or liquid (if applicable) — Brings flavors together. Balance richness with acid.
- Acid (lemon, vinegar, wine, or other) — Brightens and prevents flat-tasting results.
- Final finish (garnish, glaze, or sauce) — Prevents one-dimensional taste and adds visual appeal.
Building the Layers So the Decoration Stays Sharp
The Bean Foundation
Spread the refried beans into an even layer first and push them all the way to the corners of the dish. This layer should look smooth, not ridged, because every bump shows through the finished dip. If the beans are stubborn, warm them slightly before spreading so they settle more easily. A flat base is what keeps the rest of the dip looking intentional instead of slumped.
The Cream Cheese Middle
Mix the softened cream cheese with the taco seasoning until it turns completely smooth and pale orange. If you still see streaks, keep stirring; those streaks are pockets of seasoning that can taste harsh in one bite and bland in the next. Spread it gently over the beans so you don’t drag the bottom layer up into the middle. This layer is where a lot of taco dips get grainy, usually because the cream cheese was too cold or the mixing bowl was too small.
Guacamole, Cheese, and the Flag Top
Spread the guacamole in a clean layer, then add the shredded cheese over the top. The cheese gives the dip a little extra body and helps the decorative layers sit on something with texture instead of sliding over wet avocado. Pipe the sour cream stripes with a bag or a zip-top bag fitted with a corner snip, then fill in the red rows with salsa or diced tomatoes. Keep the rows close together and work slowly; if you rush, the stripes blur and the flag stops reading clearly.
Finishing and Chilling
Arrange the black olives tightly in the upper-left corner, then scatter green onions over the rest of the surface. Chill the dip for 30 minutes before serving so the stripes set and the flavors settle together. If you skip the chill, the sour cream and salsa can slide as soon as the first chip goes in. Cold service also makes the layers taste cleaner and brighter.
How to Adjust This Flag Dip for Your Crowd
Make It Vegetarian-Friendly Without Losing the Taco Dip Feel
This recipe is already vegetarian as written, so the main job is keeping the layers hearty. Use a thick refried bean base and a chunky guacamole so the dip still feels substantial enough for a party platter. If you want a little more bite, add a handful of chopped pickled jalapeños between the guacamole and cheese layers.
Swap the Dairy for a Lighter, Dairy-Free Version
Use a dairy-free cream cheese and a plain unsweetened dairy-free sour cream substitute. The texture will be a little softer, so chill it longer before serving to help the top hold its shape. Skip any thin, pourable alternatives here; this dip needs spreadable products with enough body to support the flag design.
Stretch It for a Bigger Party
Double the beans, cream cheese, and toppings, then move up to a larger shallow rectangular tray. The flag design needs surface area, not depth, so a wider dish keeps the stripes visible and gives more people room to scoop without wrecking the whole top in one pass.
What to Do if You Want More Heat
Stir a little minced jalapeño or chipotle in adobo into the cream cheese layer. That keeps the heat distributed through the dip instead of sitting only on top, which matters because the decoration layers should stay clean and readable. Add spice in the middle, not the garnish, if you want people to taste it in every bite.
Storage and Reheating
- Refrigerator: Cover and refrigerate for up to 3 days. The top will soften a bit, but the flavor stays solid.
- Freezer: I don’t recommend freezing this dip. The sour cream, guacamole, and cream cheese layers break down and turn grainy after thawing.
- Reheating: Don’t reheat the assembled dip. Serve it cold, straight from the refrigerator, or let it sit at room temperature for 10 to 15 minutes if you want it a little less firm.
Answers to the Questions Worth Asking

American Flag Taco Dip
Ingredients
Equipment
Method
- Spread the refried beans in an even layer across the bottom of a large rectangular baking dish or serving tray.
- Mix the softened cream cheese with the taco seasoning until smooth, then spread evenly over the bean layer.
- Spread the guacamole over the cream cheese layer, then top with the shredded Mexican cheese blend.
- Spoon the sour cream into a piping bag or zip-lock bag with a corner snipped and pipe horizontal white stripes across the top of the dip.
- Add rows of salsa or diced red tomato between the sour cream stripes to create the red stripe effect.
- In the upper left corner, arrange the sliced black olives tightly to form the blue canton rectangle.
- Scatter the green onions across the top, then chill for 30 minutes to set the layers.
- Serve the chilled dip with tortilla chips for scooping.