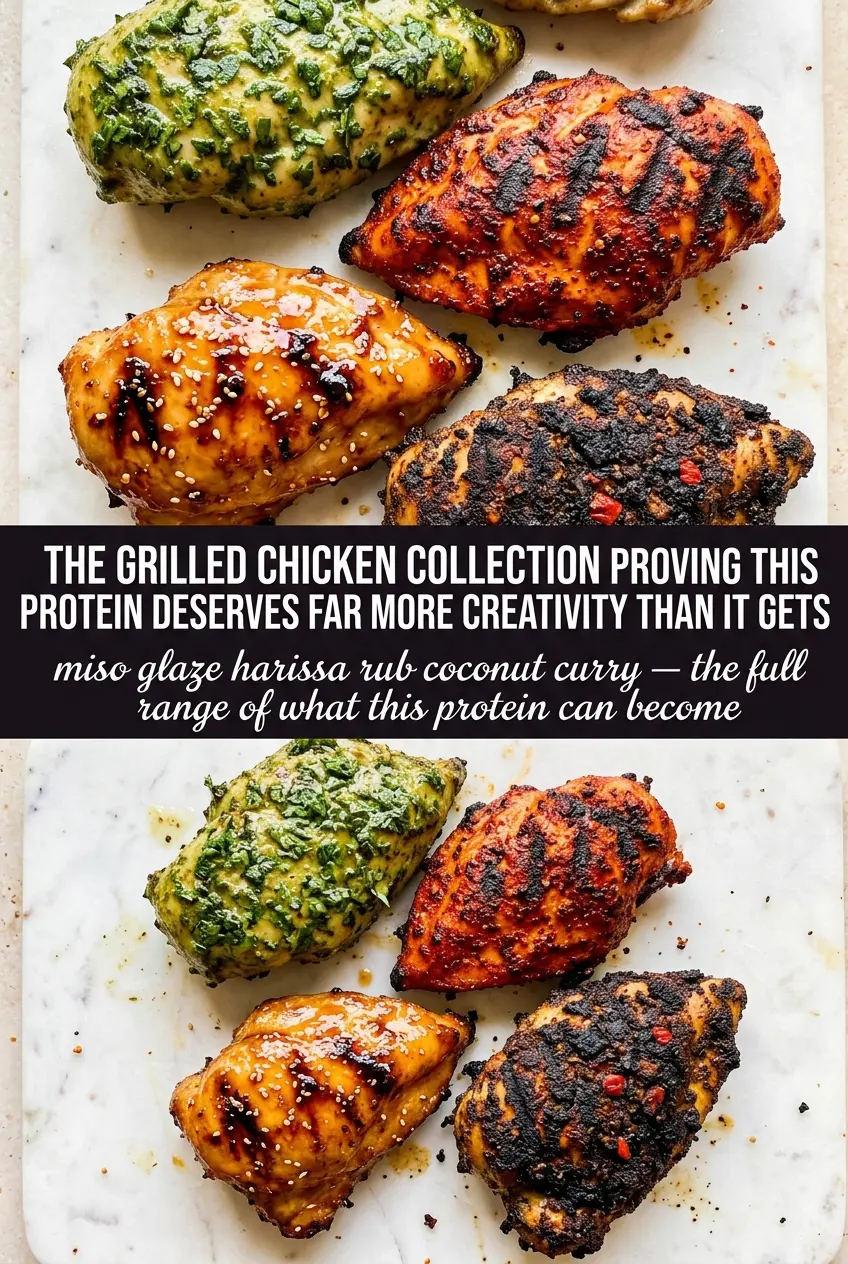
Grilled chicken gets a lot more interesting when you stop treating it like one fixed formula and start thinking in terms of cuts, marinades, and heat control. A good collection gives you options for a fast weeknight dinner, a smoky BBQ spread, or a brighter herb-and-citrus plate without changing the basic method you already know.
The trick is matching the chicken cut to the timing and the marinade to the heat. Breasts need shorter cooking and a little more care so they stay juicy. Thighs and drumsticks can take bolder seasoning and a longer kiss of the grill, which is where that deep char and sticky edge happen. Once you understand that rhythm, you can move between flavors without guessing.
Below, you’ll find the small details that make grilled chicken turn out better: when a marinade does the heavy lifting, when a dry rub is the better choice, and how to keep the grill hot enough for color without drying out the meat.
The lemon-garlic marinade caramelized beautifully on the grill, and the thighs stayed juicy even after a few extra minutes. I used the herb rub on the drumsticks the next night, and both versions came off the grill with great color and no dryness.
Save this grilled chicken collection for the nights when you want one method and a handful of bold marinades to choose from.
The Part Most Grilled Chicken Gets Wrong: Heat, Not Marinade
The biggest mistake with grilled chicken collection cooking is assuming the marinade alone will save the day. It won’t. A great marinade adds flavor and helps with browning, but if the grill is too cool, the chicken steams; if it’s too hot and the pieces are too thick, the outside burns before the center catches up. The win here is matching heat to cut, then letting the chicken rest long enough to keep those juices where they belong.
Different cuts need different handling. Boneless breasts cook fast and dry out fast, so they need direct heat and close attention. Thighs and drumsticks have more fat and connective tissue, which means they can take stronger seasoning and a little extra time over the fire without turning leathery. Once you start thinking in terms of cut first and flavor second, the whole collection gets easier to use.
- Chicken breasts — Best when pounded to an even thickness so the thinner end doesn’t overcook before the thick end is done. They take on lighter marinades well and benefit from a short rest after grilling.
- Chicken thighs — The most forgiving cut in the collection. They hold up to bolder rubs, sweeter glazes, and longer marinating times without drying out.
- Chicken drumsticks — Great for high-flavor, hands-on grilling. The skin and bone help protect the meat, but they need enough time for the heat to reach the center cleanly.
- Citrus and herbs — Brighten the chicken fast, but don’t marinate too long if the mixture is heavy on lemon or lime. Acid can tighten the surface of the meat if it sits overnight.
What Each Marinade Is Actually Doing for the Chicken
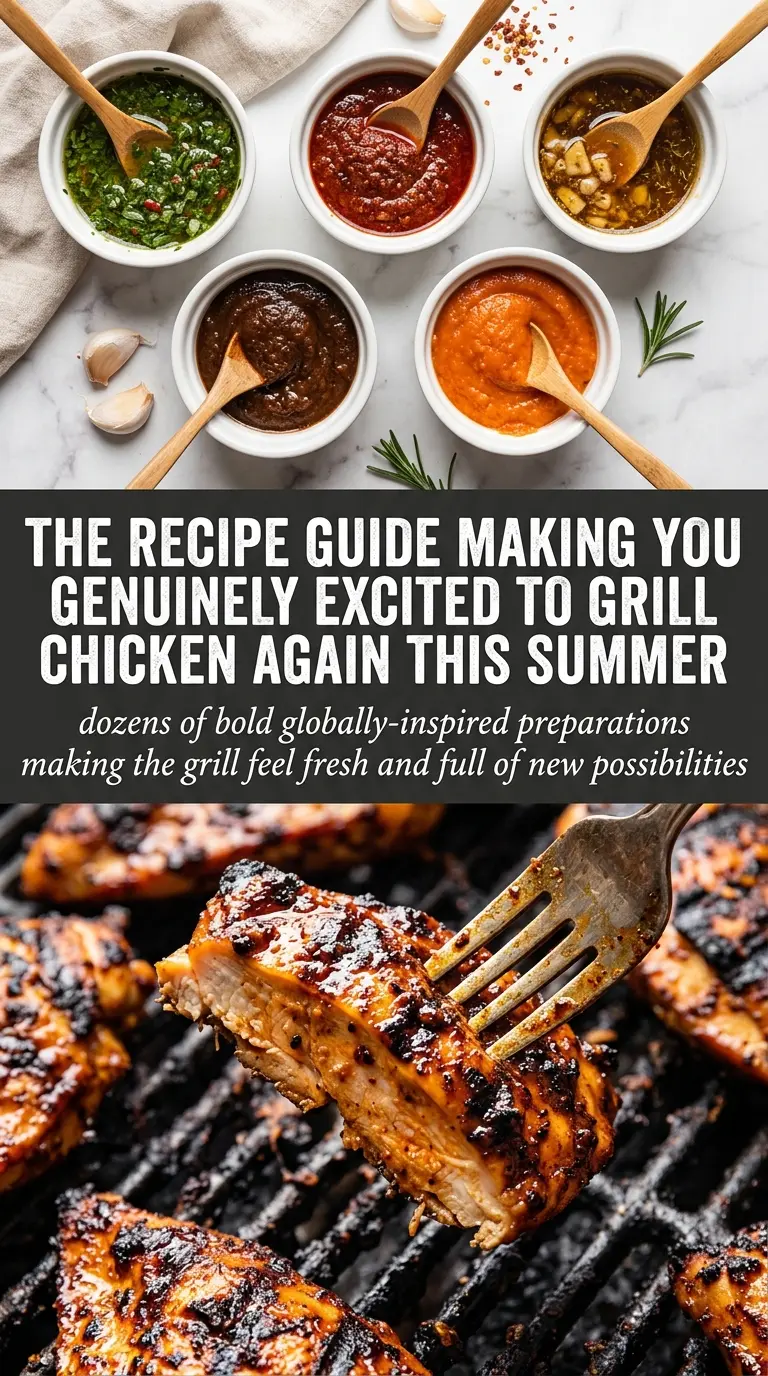
The marinade or rub you choose changes more than flavor. Oil helps carry seasoning across the surface and encourages browning. Acid, like citrus or vinegar, gives the chicken a brighter finish, but it works best with shorter marinating times. Sugar or honey adds lacquer and color, though it needs closer attention on the grill because it can darken fast.
Store-bought marinades work fine when you need convenience, but the most reliable versions balance salt, fat, and acid instead of leaning too hard on one note. If you’re using a dry rub, pat the chicken dry first so the spices cling and the surface can actually char. That step matters more than people think.
- Olive oil or another neutral oil — Helps the seasoning stick and keeps the exterior from drying out. Use a good oil if the marinade is simple; a basic one is fine if the spices are doing most of the work.
- Garlic, herbs, and spices — These define the personality of the dish. Fresh garlic is sharper, while garlic powder blends more evenly into rubs and won’t burn as quickly.
- Citrus juice or vinegar — Adds lift and helps the surface of the chicken take on color. Use enough to brighten, not so much that the chicken turns chalky from a long soak.
- Sweeteners like honey or brown sugar — Give you that sticky grilled edge. They’re optional, but they matter if you want deeper char and a glaze-like finish.
Building Grill Marks Without Drying Out the Meat
Start With Even Pieces
Chicken cooks more predictably when the pieces are the same thickness. Pound breasts to an even level or trim oversized pieces so one end doesn’t race ahead of the other. If you’re grilling bone-in cuts, give them a little more time and expect the meat near the bone to lag behind the surface. Uneven pieces are the fastest way to get char outside and undercooked centers.
Get the Grill Hot Before the Chicken Goes On
Put the chicken on a clean, hot grate and let it sear before moving it. If the grill isn’t hot enough, the meat sticks and drags instead of releasing cleanly. You want a firm sizzle and defined marks within a few minutes. If sugar is in the marinade, keep a close eye on the flame because sweetness can go from browned to burned fast.
Turn Once, Then Finish Gently
Flip the chicken when it releases easily and the first side has good color. Don’t keep flipping back and forth; that just interrupts browning. For thicker pieces, move them to a cooler part of the grill to finish if the outside is coloring too quickly. The center should reach safe temperature without the surface looking dry or brittle.
Let It Rest Before Serving
This part matters more than people want to admit. Resting for a few minutes keeps the juices in the meat instead of letting them run all over the cutting board. If you slice too soon, even perfectly grilled chicken can eat dry. Give it a short rest, then serve with the grilled vegetables or sauces that match the marinade you chose.
How to Adapt This Collection for Different Grills and Diets
Make It Dairy-Free Without Losing Juiciness
Most grilled chicken recipes like these are already easy to keep dairy-free. Use oil-based marinades, herb pastes, citrus, and spices instead of yogurt or butter-heavy sauces. You’ll still get moisture and browning, and the flavor stays clean and bright.
Use Thighs When You Want More Forgiveness
If you’re nervous about overcooking, thighs are the safest place to start. They handle longer marinating times, more aggressive seasoning, and a little extra grill time without drying out. The tradeoff is a richer, fattier bite instead of the leaner texture you get from breast meat.
Make It Gluten-Free With the Right Bottled Sauce
Most of the collection is naturally gluten-free, but bottled barbecue sauces and marinades can hide soy sauce or thickeners. Read labels carefully and use a certified gluten-free sauce if you’re glazing the chicken at the end. The flavor stays the same; you just avoid a hidden ingredient problem.
Turn It Into a Mixed Grill
Add vegetables that can handle the heat, like peppers, onions, zucchini, or halved corn. Grill them alongside the chicken and let the charred edges pick up some of the same seasoning. That turns one marinade into a full meal instead of just a protein.
Storage and Reheating
- Refrigerator: Store cooked grilled chicken in an airtight container for up to 4 days. The exterior will soften a little, especially if it was glazed.
- Freezer: Grilled chicken freezes well for up to 2 months. Wrap pieces tightly and freeze them flat so they thaw evenly without getting waterlogged.
- Reheating: Reheat gently in a covered skillet over low heat or in a 300°F oven with a splash of water or broth. High heat dries out grilled chicken fast, especially breasts.
Questions I Get Asked About This Recipe Collection
Creative Grilled Chicken Recipes Collection
Ingredients
Equipment
Method
- Choose your preferred marinade or rub from the collection and decide which chicken cuts you’ll use (breasts, thighs, or drumsticks). This sets the flavor profile for the whole variety pack.
- Prepare the chicken by patting it dry and coating it with the marinade or rub, then add fresh herbs plus citrus juice and zest to match your flavor direction. Make sure every piece is evenly covered for consistent grilling.
- Marinate the chicken for 30 minutes to overnight, covered in the refrigerator. Use the longer time for deeper flavor and the shorter time for a quick grilling plan.
- Preheat the grill to 400°F, using direct heat for a fast sear. Keep the lid closed as much as possible to maintain temperature.
- Grill the vegetables for 8 to 12 minutes, turning once, until tender with grill marks. Cook them alongside or shortly before the chicken so they’re hot when serving.
- Grill chicken breasts for 16 to 22 minutes total, turning once, until the thickest part reaches 165°F. Let the surface caramelize while you avoid pressing the meat.
- Grill chicken thighs for 20 to 28 minutes total, turning once, until the thickest part reaches 175°F. Continue grilling until juices run clear and the exterior is browned.
- Grill chicken drumsticks for 25 to 35 minutes total, turning every 10 minutes, until the thickest part reaches 175°F. Grill until the skin is crisp and the center is fully cooked.
- Rest the chicken for 5 to 10 minutes before serving to help juices redistribute. This keeps the texture juicy after the grill.
- Pair the grilled chicken with serving sauces and accompaniments, and mix and match flavors across your chicken collection. Serve with the grilled vegetables for a complete variety pack plate.