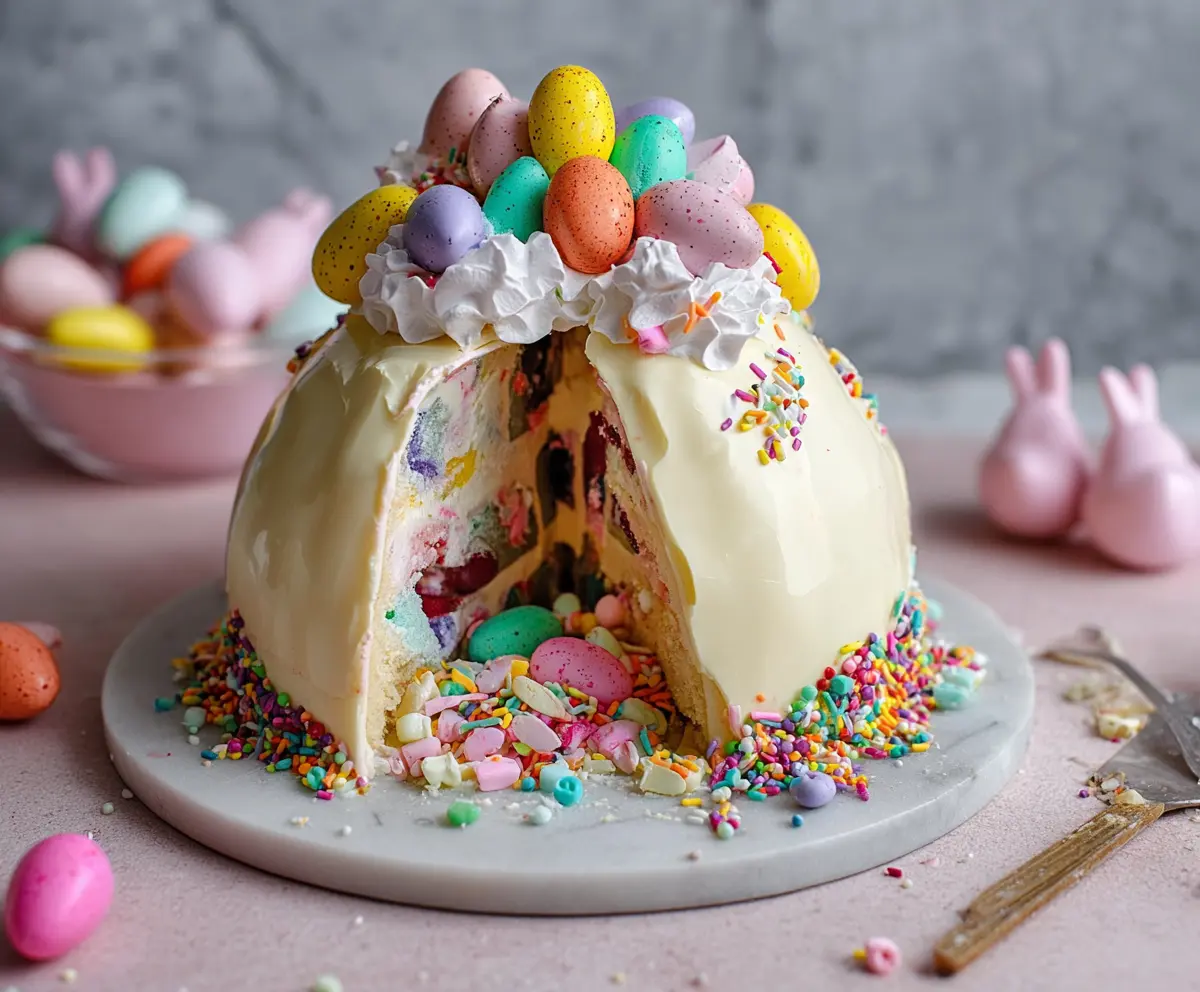
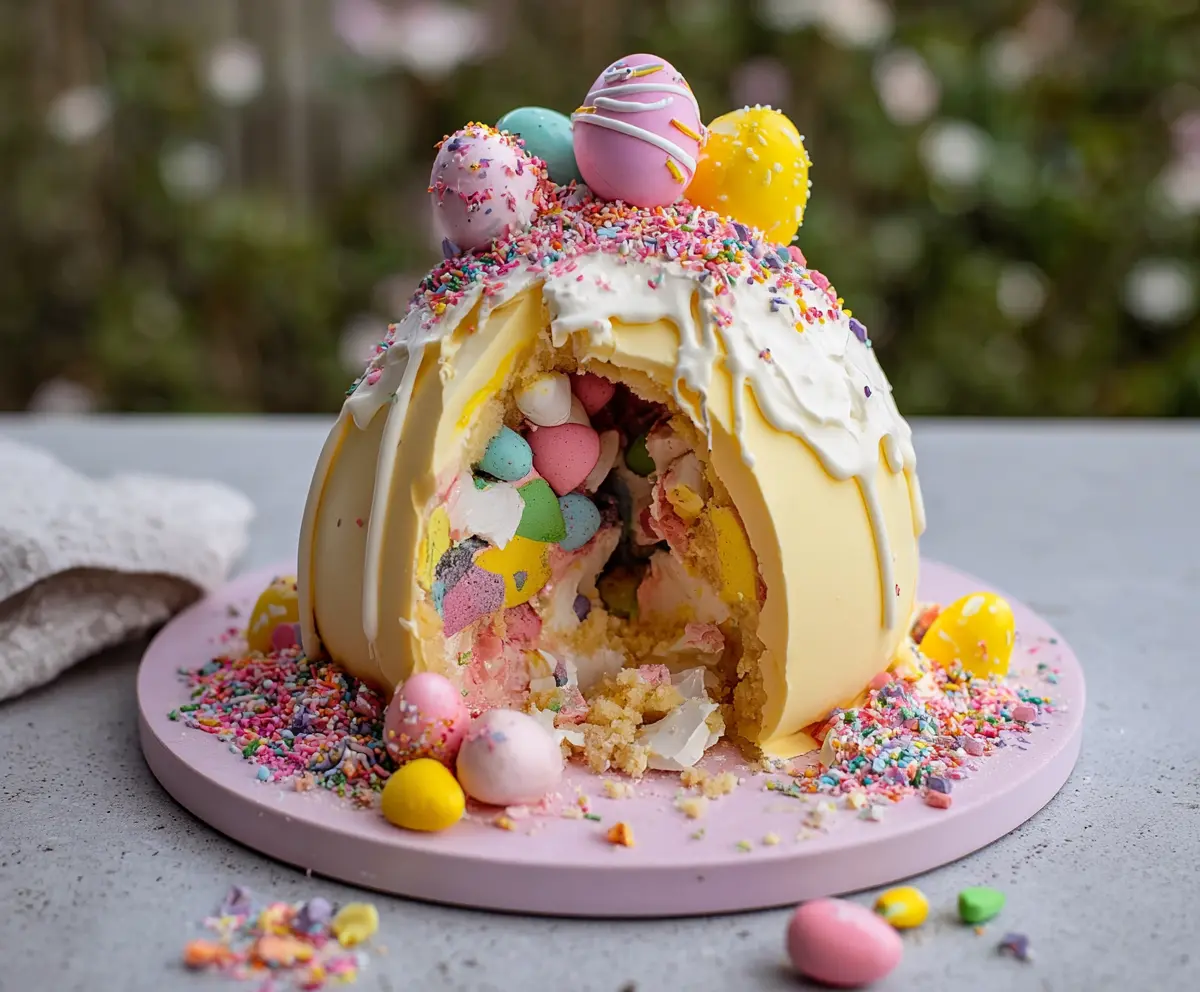
This Epic Easter Egg Smash Cake is a fun treat for everyone! It features a soft cake filled with colorful candy eggs that burst out when you cut into it. How cool is that?
It’s perfect for celebrating with family and friends. I love how it surprises everyone with that candy explosion! Just remember to have a camera ready for all the smiles. 📸
Key Ingredients & Substitutions
All-Purpose Flour: It’s essential for the cake’s structure. If you’re gluten-free, try a 1:1 gluten-free flour blend, which often works well as a substitute.
Unsalted Butter: This adds richness and moisture. If you want a dairy-free version, use a plant-based butter instead, or coconut oil for a slightly different texture.
Granulated Sugar: White sugar helps achieve that perfect sweetness and texture. For a healthier twist, you can swap with coconut sugar, but it may change the cake’s color slightly.
Heavy Cream: This adds creaminess to the frosting. You can substitute it with milk or non-dairy milk (like almond or oat) if you want a lighter version.
Mini Chocolate Eggs: These are a fun and colorful surprise! If you’re avoiding chocolate, use fruit candies or jelly beans for a similar effect.
How Do I Achieve a Fluffy and Light Cake?
The key to a fluffy cake is proper creaming of the butter and sugar. Make sure your butter is at room temperature for better blending. Cream until the mixture becomes light and fluffy, which usually takes several minutes.
- Combine your dry ingredients separately to ensure even distribution before mixing them with the wet ones.
- When you mix in the flour and milk, do this alternately starting and ending with flour. This helps keep the batter from getting overmixed, which can lead to a denser cake.
- Remember to scrape down the sides of your bowl to ensure everything is well mixed.
How to Make Epic Easter Egg Smash Cake
Ingredients You’ll Need:
For The Cake:
- 2 ½ cups all-purpose flour
- 2 ½ tsp baking powder
- ½ tsp salt
- 1 cup unsalted butter, room temperature
- 1 ¾ cups granulated sugar
- 4 large eggs
- 1 tbsp vanilla extract
- 1 cup whole milk
For The Frosting & Filling:
- 1 ½ cups unsalted butter, room temperature
- 5 cups powdered sugar, sifted
- ¼ cup heavy cream or milk
- 2 tsp vanilla extract
- Few drops of food coloring (optional)
For Decoration & Smash Inside:
- Mini colored candy-coated chocolate eggs (like Cadbury Mini Eggs)
- Assorted pastel-colored candy sprinkles and edible confetti
- Whipped cream (for topping)
- White chocolate ganache or glaze (optional, for smooth exterior)
- Mini marshmallows and candy pieces for filling surprise
How Much Time Will You Need?
This delicious cake typically requires about 1 hour for preparation and baking, plus an additional 20 minutes for chilling and decorating. In total, you’re looking at around 1 hour and 30 minutes from start to finish—perfect for a fun Easter celebration!
Step-by-Step Instructions:
1. Preheat and Prepare Pans:
Start by preheating your oven to 350°F (175°C). Grease and flour two 8-inch round cake pans or line them with parchment paper to ensure your cakes come out smoothly.
2. Make the Cake Batter:
In a medium bowl, whisk together the flour, baking powder, and salt. Meanwhile, in a large bowl, cream the room temperature butter and granulated sugar together until the mixture is light and fluffy. Add the eggs one by one, mixing well after each addition, and then stir in the vanilla extract.
3. Combine Wet and Dry Ingredients:
Gradually alternate adding the dry flour mixture and the milk to the creamy butter mixture. Start and end with the flour mixture, mixing gently until just combined. Be careful not to overmix!
4. Bake the Cakes:
Divide the batter evenly between the prepared pans. Bake for 25-30 minutes or until a toothpick inserted in the center comes out clean. Once done, let the cakes cool in their pans for about 10 minutes, then carefully turn them out onto a wire rack to cool completely.
5. Prepare the Buttercream Frosting:
In a separate bowl, beat the room temperature butter until creamy. Gradually add in the sifted powdered sugar, mixing thoroughly after each addition. Pour in the heavy cream and vanilla extract, then beat on high speed until the frosting becomes light and fluffy. If you’d like, add a few drops of food coloring to make it festive!
6. Create the Cake Dome and Center:
Once the cakes are cool, cut each cake horizontally into two layers, giving you a total of four layers. On a large plate or cake board, start stacking the layers in a dome shape (you can also use a hemispherical mold if you have one). Between each layer, spread a layer of buttercream and add mini marshmallows, assorted candies, and mini eggs to form a fun “smash” center.
7. Assemble the Cake:
After creating the dome, cover the entire cake with a crumb coat of buttercream. Chill the cake in the fridge for about 20 minutes to set the frosting, then apply a smooth final coat of buttercream to get a nice finish.
8. White Chocolate Coating:
If you’d like a smooth exterior, melt some white chocolate or make white chocolate ganache. Pour it evenly over the chilled cake for a glossy look, and let it set slightly.
9. Decorate the Cake:
Pipe whipped cream around the top edge of the cake, then arrange your colorful speckled candy eggs on top. Add some sprinkles and edible confetti around the base and on the surface of the cake for an extra festive touch.
10. Final Touch:
For that finishing flourish, scatter some extra candies, mini marshmallows, and sprinkles around the base of the serving plate to catch the “smash”! Refrigerate until you’re ready to serve.
11. Serve and Enjoy:
When it’s time to enjoy your cake, cut into it or give it a fun smash to reveal the candy-filled surprise inside. Enjoy the colorful explosion of flavors with family and friends!
Can I Use a Different Cake Pan Size?
Yes! If you don’t have 8-inch round pans, you can use 9-inch pans, but keep an eye on the baking time, as they may cook a bit faster. Alternatively, you can make cupcakes using the same batter; they typically bake for 18-22 minutes.
How Can I Make This Cake Dairy-Free?
You can substitute the butter with plant-based butter and the whole milk with almond milk, oat milk, or any other dairy-free milk. Just ensure the buttercream frosting uses dairy-free alternatives as well for a complete dairy-free treat!
What Should I Do If My Cake Falls Apart When Cutting?
If your cake is crumbling, it’s likely overbaked or not cooled enough before cutting. Always ensure the cakes are completely cooled before assembling. If they seem fragile, you can chill them in the fridge for an hour to firm up before cutting.
How Do I Store Leftover Cake?
Store leftover cake in an airtight container in the fridge for up to 3 days. To maintain freshness, you can also wrap individual slices tightly in plastic wrap before placing them in the container.